Overview
Gnosis version 1.2.860 and above supports an integrated Zoom Meetings option for any event on the events calendar. You must use a Zoom paid (Pro or above) plan to use this functionality.
To set up your system for Zoom Meetings, see: Setting Up Zoom Meeting Integration.
PLEASE NOTE: If you intend to use this functionality, please read through this full document carefully as there is some essential information herein.
There are three parts to the integrated Zoom functionality in Event Management:
- Zoom information in the event setup screen.
- Zoom information in the "Event Registration Administration" schema allowing you to auto-advise event registrants of joining information prior to sessions starting.
- A zoom meetings page on your web portal that allows participants to attend on your website using their browser or optionally via the zoom application.
Zoom meetings are also integrated into the Contact Management tab on Person & Organization records. This allows you to book a Zoom meeting at the same time as recording an upcoming one-on-one session in contact management.
As Gnosis manages access to the Zoom meeting sessions for event participants with a simple link, zoom meeting ID's and passwords are generally not required to be known by attendees. To attend, they only need the link emailed to them. This also allows you to change meeting user accounts or ID's as needed without needing to communicate any change to participants as Gnosis will automatically use the information present at the event time to admit participants.
Zoom Meetings in Event Management
An event can be enabled for Zoom Meeting by adding the Zoom meeting information using the Blue Zoom button (1) on the event form:
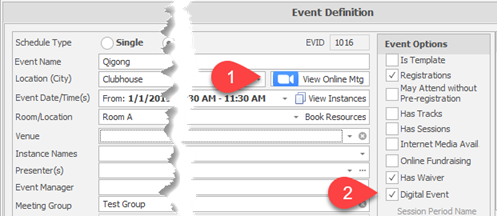
When adding Zoom information, the "Digital Event" checkbox (2) will also be set so that statistics gathering may be correctly categorized for in-person and online meetings.
The meeting information and generally a meeting password may be entered manually or you can have Gnosis automatically book the meeting for you.
To Have Gnosis Book Your Zoom Meeting
Click on the "Set Online Meeting" - or if a meeting is already setup, the "View Online Meeting" button in the event to display the Online Meeting Information dialog.
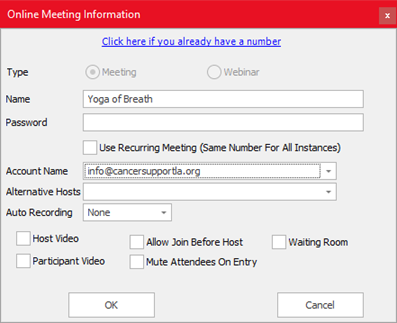
- If one or more of your accounts has the webinar upgrade option, you will be able to choose Zoom Meeting or Zoom Webinar for the meeting type.
- Edit the meeting name if desired. By default, we include the Event ID so you can easily track meetings back to Gnosis Events from within your zoom account. This name will be displayed as the meeting title in the Zoom meeting.
- Enter a password if you wish the meeting to have one. Registered persons will not need to enter the password, but unregistered persons (if allowed by event settings) will need to enter the password to attend.
- To use the same meeting ID for all instances (for multi-instance events), check the box for Use Recurring Meeting.
- Select the Zoom Account (email) to be used for the event.
- Select the meeting options to be set when creating the event.
- Auto Recording - The option to automatically record the meeting Locally or in the cloud (if you have purchased this option).
- Host Video - host video will be enabled.
- Participant Video - participant video will be enabled.
- Allow Join Before Host - participants may attend a waiting room before the host begins.
- Mute Attendees On Entry - all attendees will initially have their audio muted.
- Waiting Room - attendees will be held in a waiting area until you admit them.
- Press OK.
By default, the Zoom meetings will be created by Gnosis eight days before each event instance date. This is done to ensure that you do not exceed the 100 meetings/day per account setup limit imposed by Zoom meetings.
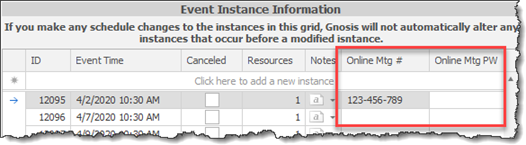
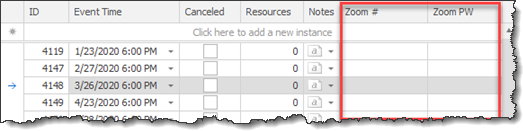
If you have chosen Use Recurring Meeting/Same Number for all Instances, the Zoom meeting info for instances within the 8 days (default lead-time for creating meetings) will appear in the event within 30 minutes of creating the meeting. If you have selected to NOT have the same meeting ID/password for each instance, then Gnosis will book the Zoom meeting for each instance 8 days (default) before the event instance date and the event instance list will be populated with the Zoom meeting ID and password for each booked instance:
IMPORTANT NOTE: If you have asked Gnosis to book the Zoom meeting, it may take up to 30 minutes for Gnosis to book the meeting in Zoom, however, you will still be able to send out registration confirmation emails immediately as these do not contain zoom meeting information, only a Gnosis link that will ultimately send the meeting information to the Zoom application when it is time for the meeting to start.
To Enter the Meeting Number of an Existing Zoom Meeting
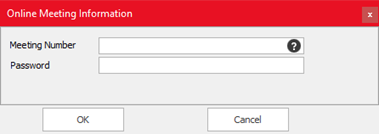
- In the same Online Meeting Info box click the link, Click here if you already have a meeting number.
- Enter the existing zoom meeting number from your Zoom account.
- Click on the (?) icon to have Gnosis verify the entered meeting ID is valid. If a password has been configured, it will be automatically shown after the meeting id is verified.
- Click OK to continue on to edit and save the event.
IMPORTANT NOTE: When using Gnosis to manage zoom meetings created in Zoom, do not turn on the "Zoom Registrations" option as this will effectively disable all Gnosis functionality and communications for that meeting. The Gnosis registration option effectively replaces the Zoom registration option.
If you have a scenario that requires you to have a different Zoom meeting ID on each instance of a recurring event, you have the option to manually enter specific zoom information for an instance. Any meeting defined at the instance level will override the meeting information in the main screen (if any):
Listing Only Online Meeting Events
In the Event Central screen, there is a new checkbox that allows you to filter the meeting list to show online events only.
Your calendar also had the option to show only online meetings also so that you can easily toggle off all non-online events during the shelter in place period. Your administrator can set a system preference in "Settings | Preferences & Settings > Filter the list with the keyword "meeting" and set the organization level preference for "Only show events with online meetings in the calendar".
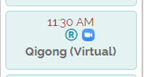
The online calendar will also have a small zoom icon to illustrate that the program is being held online:
Sending Zoom Meeting Info to Registrants
Important: If you are needing to manage Zoom (digital) and in-person events, referred to as hybrid event management, please refer to the guidance and communications templates provided within the following:
- Initial Setup Hybrid Event Management
- Hybrid Event Management (In-Person and Digital)
- Hybrid Event Management for Group Members
On the second page of the event setup screen, you can choose a registration confirmation email that is set-up to provide a link to the Zoom meeting attendance page on your portal.
The Zoom meeting link (see next section for more information) should be selected as the Registration Confirmation email for Zoom events. Also, make sure that you specify whether unregistered persons should be allowed to attend the meeting. If this is not set, only those that are pre-registered will be admitted to the meeting unless you manually provide them with the meeting ID and password.
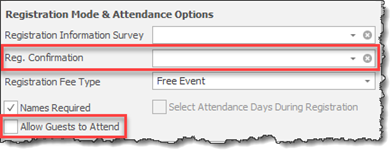
If you have set up a Password for an event, unregistered persons will not be able to attend unless they have the password, but the URL sent to registered persons does include the encrypted password so it is not required to be separately provided.
When sending Registration Confirmation emails, it can be desirable to disable the standard booking confirmation emails so that recipients don't get confused with two separate emails being received. This is done in Reference data. Choose the event category desired and disable the Booking Confirmation email for all events in that category: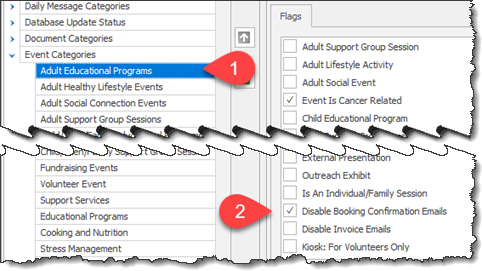
Zoom-Only Meeting Emails
Important: If you are needing to manage Zoom (digital) and in-person events, referred to as hybrid event management, please refer to the guidance and communications templates provided within the following:
- Initial Setup Hybrid Event Management
- Hybrid Event Management (In-Person and Digital)
- Hybrid Event Management for Group Members
The information below pertains the management of only Zoom based events. Attached below are template emails that can be automatically sent to all registrants of Zoom meetings provide meeting info and a Join link.
You may also build your own email, add a button and use the "Zoom Meeting Link" option in the "Special Mail Merge" fields group to add the Zoom meeting URL to the button. We recommend starting with the templates attached to the bottom of this message and described below.
IMPORTANT NOTE: When sending emails to registrants for an event, if the event is also linked to a membership group, members of that group will also receive the emails.
Setting up a Zoom Registration Reminder Email with Zoom Meeting link included.
Email Templates
Note: In the attachments area at the bottom of this article, you will find a file containing four Zoom communication templates where you just need to add your logo and sender information:
- Zoom Meeting Info for Event Registrants (Not for Auto Conf)
Use this item to manually send zoom information to event registrants for events in the next 6 days.. It prompts you for an Event ID. - Zoom Meeting same-day reminder email
Schedule this item to go out every morning before 6 am to send registrants auto-reminders for zoom meetings the same day - Zoom Meeting Registration Confirmation
Use this item in the Event Setup page to auto-send when someone registers for a program. The other items are not suitable for this purpose.
To import the templates package into your system, have an administrator go to the desired communications category, click on the Admin Options checkbox, and then import the templates.
Setting Up Your Own Emails
The Zoom meeting link can be added to any email that uses a recipient group based on the Event Registration Administration schema. We recommend using the templates we provide and copying and modifying them as needed.
To add a Zoom link to the email:
- Add a button to the email with its text set to something like "Attend".
- Locate the Zoom Meeting URL field in the "Special Mail Merge Fields" category of the field list
- Double-click on the field to copy and then paste it into the URL section of the button properties.
When this link is clicked on, it will open the Zoom Meeting Join Page for each recipient that receives it.
You can also add the Zoom meeting number and password in the email is desired using the following fields in the Events area:
- Online Meeting Number
- Online Meeting Password
Upcoming Meeting Info Page for Participants
The optional Upcoming registrations, meetings & Group Events page in a person's portal pages provides a join link for online events, group meetings, and meetings created in Contact management:
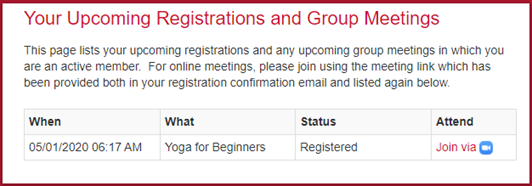
If you are familiar with the process for building Gnosis Portal Pages using the Composite CMS and you wish to build this page yourself, you will find the Gnosis function in the "Data Controls" folder - it is called "Person Itinerary". For our other clients, we will be happy to add this page for you on request.
Zoom Meeting Join Page
When the attendee clicks on the link in the email, they are taken to a portal web page that contains the Zoom meetings player. On arrival at this page, they are presented with the following information:
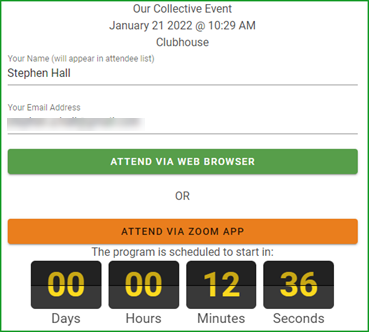
In this welcome screen, the participant may amend their name that will be shown in the participant list prior to joining.
The "Attend Via Web Browser" button (visible if enabled in your system) will launch the meeting directly in their browser. No Zoom application is required to be installed by the participant. If the participant prefers to use the Zoom app, the "Attend via Zoom App" button will launch the zoom application directly into the meeting session.
The join buttons are only displayed when the event start time is within 30 minutes. Prior to that time, only the countdown time is displayed. When someone joins the meeting via either method listed, they will be automatically marked as attending the event in Gnosis Event Attendance.
PLEASE NOTE: If you do not wish to utilize the In-Browser Zoom meeting app, this option can be disabled in Preferences & Settings with the setting called "Disable Zoom Web Client"
Reporting
To facilitate you creating your own reports, the Event Registration Administration and Event Administration schemas now include online meeting (Zoom) related fields. You can find them all under the event instance field group.
You will also find two reports attached to this article below. These reports can be scheduled to run between 6 am and 10 am every day to give you a list of upcoming online meetings with their Zoom information. To import these reports to your system, save the attached files to your computer, go to the reporting center and click on the "Import New" button next to the report search bar.
Finding Meetings in your Zoom Portal
If you are looking for recurring meetings in your zoom web portal pages, you will find them at the end of the meetings list under the recurring title:
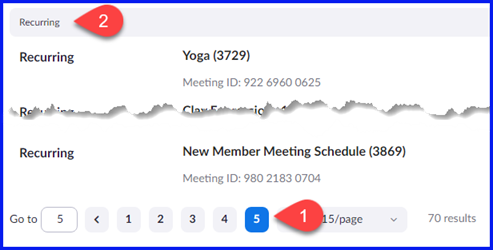
To view this area, you may need to:
- Load the last page of results using the page selection widget at the bottom of the list and possibly change the number of items per page to 100.
- Scroll to the "Recurring" section.
Add recurring meetings booked by Gnosis will be visible there.
See also:
Comments
1 comment
Am looking for password syntax.
Please sign in to leave a comment.