The Resource/Rooms Management tool can be used to manage paid bookings/room rentals at your facility. This process requires the setup of standard billing units of time and fees, and supports multiple rates, like an hourly or flat rate, as well as a non-profit and for-profit rate for either fee schedule. The booking process will automatically generate an invoice in the booking person's record and payment is managed just as any other invoice is managed in your system.
If desired, you can opt to use the Resource Management tool for paid bookings only; it is not required that you use resource booking internally for calendar events but doing so would provide a more helpful booking system in order to prevent double bookings.
This article includes the following sections:
- Paid Rentals Process Setup
- General Billing and Confirmation Email Settings
- Booking Type
- Booking Confirmation Email
- Confirm Resources for Rental Rooms
- Direct Bookings Tab in Person Form
- Setting up Room Rental Rates
- Booking a Paid Room Rental
- Editing/Canceling a Room Rental
Paid Rentals Process Setup
There are multiple settings to complete before using the paid rentals process. Review these five subsections thoroughly to ensure proper setup.
1. General Billing and Confirmation Email Settings
To review and adjust general/default settings and sending details of the confirmation email,
- Go to Settings > Preferences & Settings > Resource Management
- REQUIRED Default Booking Account - enter the four digit ID number (found in Reference Data Management) for the desired income account.
- At minimum, review the Subject for Resource Booking Invoice Emails and Body Text for Resource Booking Invoice Emails. (Note the Confirmation email item has been phased out, see more detail later in this article.)
- Review other settings and adjust if necessary.
2. Booking Type
Review the Booking Type list options found in Reference Data Management. Administrative users may add additions list options if desired. This list could be used to track bookings such as Family Events, Corporate Meetings, Third Party Fundraisers, etc.
3. Booking Invoice/Confirmation Email Design
The system provides a booking document which combines the booking details and financial invoice in one communication. This confirmation communication can be set to send to the booking person when processing the booking, and can be sent within the body of an email or as a PDF attached to the email.
To view and edit the content of this email:
- Go to the Process menu screen and click the Doc Templates icon.
- Locate the Resource Booking line item and click the three dots in the Edit column to open the document editor in a separate window.
- You can apply your logo and adjust organization details and general messaging. You will not edit the booking details or invoice section of this document.
- When finished making edits, simply close the editor window at the top right and select Yes when prompted to save the edits in your system.
If you need assistance using this document editor, send a request to Support@Connect4.net.
4. Confirm Resources for Rental Rooms
Complete the Steps 1 and 2 under Rooms and Resources Setup, in Resource/Rooms Management.
5. Direct Bookings Tab in Person Form
Paid booking details will be displayed on the Direct Bookings tab in the person form. If this tab is not currently displayed in the person form for your system, send a request to Support@Connect4.net.
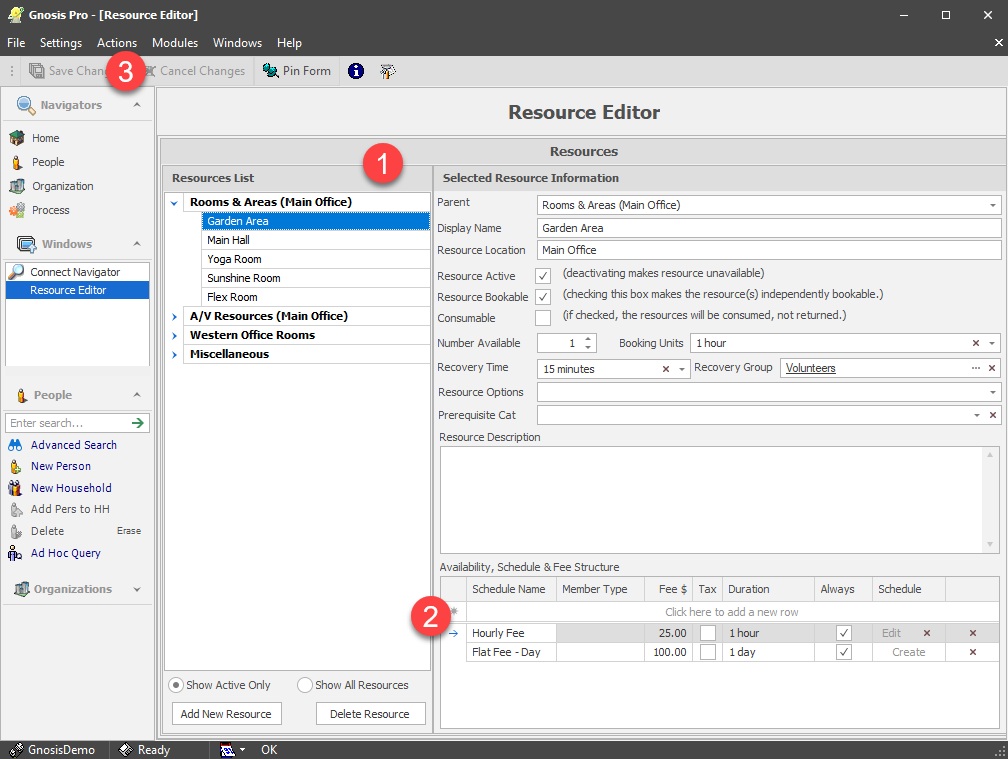
Setting up Room Rental Rates
Follow the steps below to complete the Availability, Schedule & Fee Structure section for all rental rooms.
1. Select the desired room from the Resource List.
2. Complete the Availability, Schedule & Fee Structure:
Schedule Name - Enter a name to identify the rate for the selected room. Common examples used:
- Hourly Fee
- Flat Fee - Day
Member Type - Recommended to select All from the drop-down list. If desired, you can restrict a rate to a specific Record Status type (this is uncommon).
Fee $ - The fee entered must correspond with the Duration field to achieve the desired rental rate. See Duration below.
Tax - Check if wanting the ability to include a tax rate on a room rental invoice.
Duration -
- Hourly Fee - Recommend to use the same time unit as set in the Booking Units field in the top section of the setup screen; 5 or 15 minutes is the recommend unit. This unit will then be multiplied but the Fee $ amount to determine the full rental fee. For example:
- Fee $25 x Duration 15 minutes: A one hour rental = $100
- Fee $50 x Duration 15 minutes: A one hour rental = $200
- Daily/Flat Fee Setup
- Fee $ = flat rate amount; Duration - 1 day
Always - Check this box to enable this rate for use.
3. You may add/edit multiple resource fees while on the Resource Management Screen. When finished, click Save Changes.
Booking a Paid Room Rental
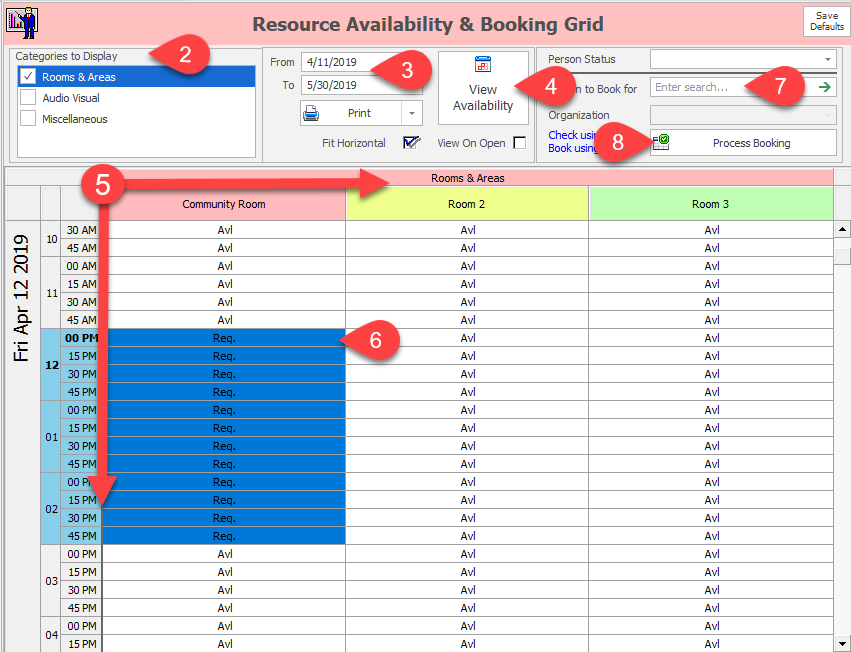
Steps to book a paid room rental which is not associated with a calendar event:
- Click the
 icon from the Home screen.
 - Check the desired Categories to Display.
- Select a desired date range.
- Click View Availability
- The bottom grid will display all applicable resources with across the top and the selected dates/times down the left side.
- Click and drag to select the date/time to book the desired resource.
- Search for the contact person's record in the database, selecting a linked organization if necessary.
- Click Process Booking to enter the final setup and billing screen.
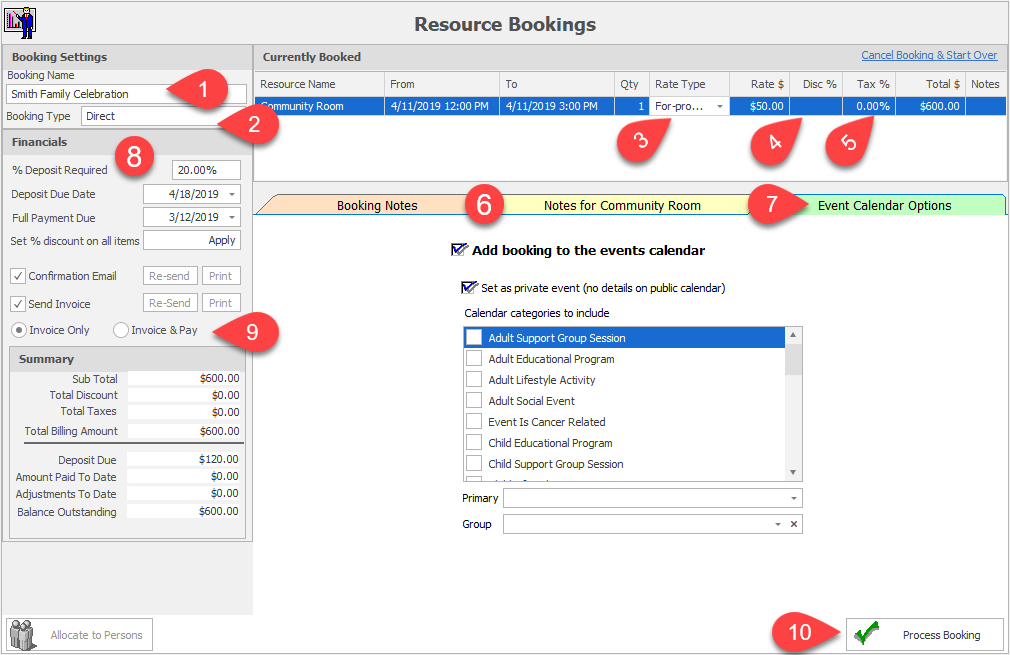
Billing Screen
- Enter a Booking Name for the event.
- Select a Booking Type from the drop-down list.
- The Currently Booked section will display the main details of the booking. To apply a different rate, click in the Rate Type cell and select the desired rate from the drop-down.
- If desired, enter a Discount %.
- If desired, enter your local tax rate as a percentage.
- Enter any notes in the tabs provided.
- Under Event Calendar Options you can opt to Add booking to the events calendar, referring to your online Gnosis calendar. Checking this box will automatically check the Set as private event setting so no details or online registration is available. If displaying on the calendar online, you will need to select an Event Category (list managed in Reference Data Management).
- Complete the Financials section as needed.
- Uncheck to turn off the Confirmation Email as this separate item has been phased out, as the confirm text has been added to the invoice email.
- See more detail on the Send Invoice communications options in the Booking Document & Communication section above.
- With Invoice Only checked, a new invoice will be created upon clicking the Process Booking button. If checking Invoice & Pay, the Process Booking will also bring up the open invoice so you can enter the payment immediately.
- Click Process Booking to save, generate the invoice, and send any selected communications items.
Editing/Canceling a Room Rental
To edit or cancel a booking, double-click the booking on the Direct Bookings tab to open the Resource Bookings screen.
Editing a Booking
You must choose to ![]() and start fresh with a new booking.
and start fresh with a new booking.
Canceling a Booking
Select to Cancel Booking to delete the details of the booking and make the resource available.
If the invoice is paid, you must complete the necessary refund process.
If the invoice has not been paid,
- Open the invoice from the person's record.
- Select the rental line item and use the red X to delete.
- Save your changes and close the invoice window; the invoice will be removed from the person's record.
Comments
0 comments
Please sign in to leave a comment.