In addition to processing online registrations through the online calendar, Gnosis users can process registrations directly through the application. If a person verbally requests to be registered or information is sent by mail, this is the process for a Gnosis user to register the person manually. This process can be used for free program events and ticketed fundraising events.
Sections included in this article:
- Gnosis Registrations Terms
- Registrations Within the Gnosis Application
- Applying Ticket Payments with Registration
- Applying a Contribution/Payment to Ticket Invoice*
*If money for ticket purchases was entered/received through Contribution Entry, this process guides you through the steps to move the gift into the ticket invoice.
Gnosis Registrations Terms
Booking: The process of making a registration in the Gnosis system.
Booking Person: The person making the booking/registration.
Registrant: Person(s) being registered.
Registrations Within the Gnosis Application
- Open Event Management from the Gnosis home screen.
- Locate the desired event and single click to select. Click Register at the bottom of the screen.
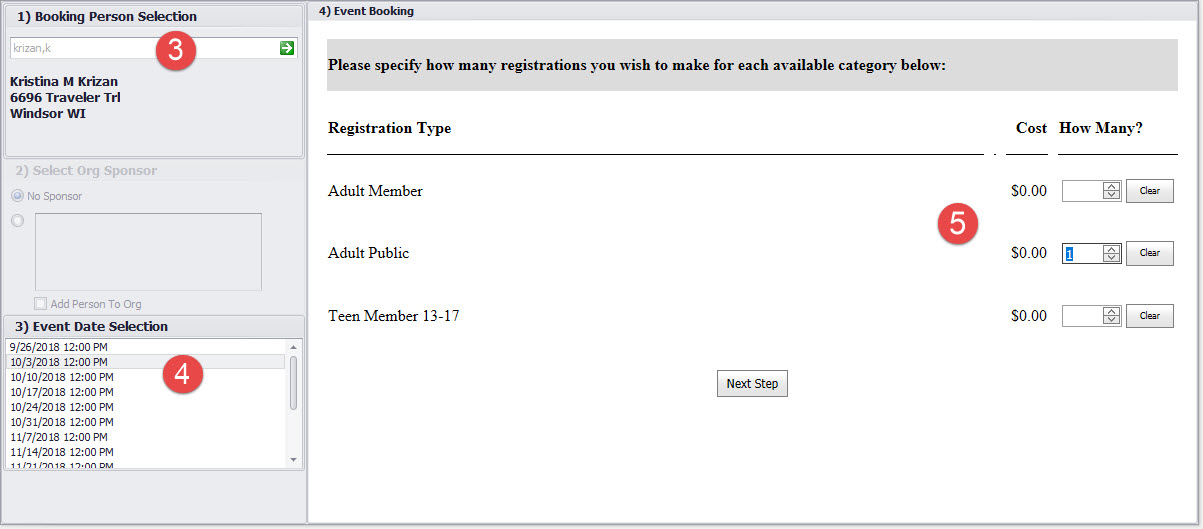
- 1) Booking Person Selection, search for the person’s name to register. If necessary, you can register multiple people under the main booking person/the person you search for initially here.
- For repeating events, confirm the correct date is selected at 3) Event Date Selection.
- 4) Event Booking: Enter the type and number of desired registrations from the options provided. Click Next Step when finished.
- If you don’t have any registration options or not the exact options you were expecting, it means the event may not have been set up correctly or that the person you are registering is not eligible for all registration types.
- To review the event settings, click Return To Event at the bottom to cancel the registration. Double-click the event to view and edit the registration settings if necessary. You may also need to check the Record Status of the person you are registering. Once you feel the settings have been updated correctly, start again at step 2 above.
- The next screen provides a line for each registration identified on the previous screen. Use the Auto-Fill option to assign the registration to the necessary person/people. Click Next Step when finished.
- Other linked persons will also be available in the Auto-Fill options.
- If a person is not available in the Auto-Fill options, enter their First, Last and Email Address.
- If there is an existing record, the system will identify it and apply the registration to the appropriate person.
- If this is a new person, the system will automatically create a new record.
- If registering an unnamed guest and the event registration settings do not require names, you may leave a registrant name/line blank.

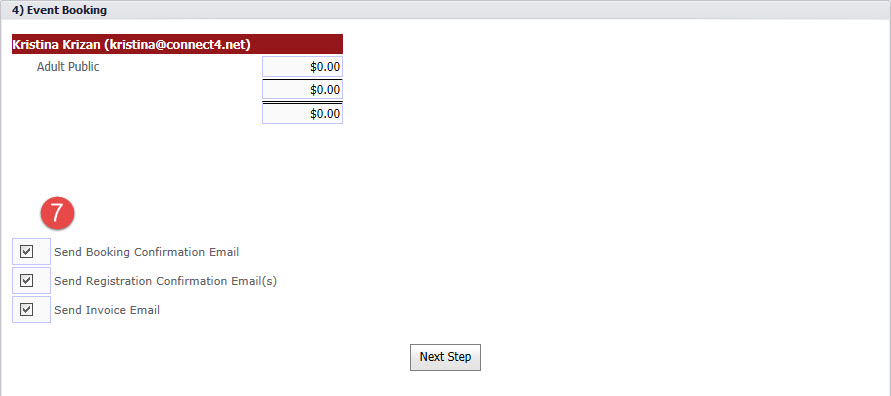
- The final screen will display all the people being registered in this booking. For ticketed events where payments are required, see Applying Ticket Payments steps below. There are three possible communications to be sent when after clicking Next Step on this screen.
- Send Booking Confirmation Email: If left checked, the system will send the standard confirmation email to the booking person, confirming all registrations.
- Send Registration Confirmation Email(s): If a separate email has been created in Communications and selected in the event setup, the email will be sent to all registrations. If this remains checked but there is no email assigned in the event settings, there is no email to be sent. See Event Registration Documentation Options for more information.
- Send Invoice Email: If a ticketed event and payment is made, the system automatically creates an invoice and a separate email attaching the invoice will be sent, if the box remains checked. If there is no ticket fee but the box remains checked, there is no invoice to be sent.
8. A success page will appear when the registration(s) are complete.
Applying Ticket Payments with Registration
- If payment is required, the final registration screen will display a Pay By field, offering the following options:
- Credit Care (Online) = credit card payment
- Click Next Step to enter credit card and billing info
- The funds will automatically be included in the selected income batch for processing; you will NOT enter these funds in Contribution Entry.
- Pay by mail = check or cash payment now
- Additional fields will appear to enter the payment information directly on this screen.
- The funds will automatically be included in the selected income batch for processing; you will NOT enter these funds in Contribution Entry.
- Pay at door = no payment entered no (this is uncommon)
Applying a Contribution/Payment to Ticket Invoice
All ticket purchases must be processed through event registration to ensure the registrants are added to the event roster. If money for ticket purchases was mistakenly entered in Contribution Entry, or if a donor made a direct payment using the donation page, follow these steps to move the funds and properly book the necessary tickets.
- Using the guidance above, properly register this person for the event, along with any guests.
- On the final registration screen, under Pay By, select Pay at door to complete the registration without payment.
- Open the Booking Person's record and go to the Contributions tab and see Pay Invoice using Contribution Gift to apply the existing gift to the new invoice created during the registration process.
Comments
0 comments
Please sign in to leave a comment.