Overview
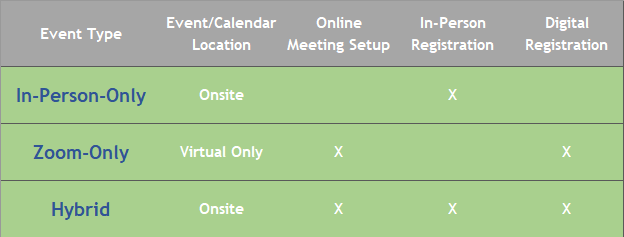
Gnosis Event Management supports Zoom-only events, In-person-only events, and now hybrid events where both registration types are available.
Management of these three different types of events requires process changes in Event Management, Communications, and possibly the setup of your online calendar. We recommend you meet as a team to discuss these changes and the necessary implementation steps.
One-Time Setup Steps
Below are the one-time setup items when preparing to offer a combination of event types: in-person-only, Zoom-only, and hybrid.
The Six Steps Outlined Below:
- Complete Registration Flags Setup
- Create New Virtual Only Event Location
- Import & Setup New Confirmation Emails
- Import & Setup New Event Reminders (Email & Text)
- Schedule New Reminder Emails and Texts
- CSC/Gilda's Clients Only - Turn Off Temporary Attendance Setting
________________________________________________________________________________________________________________
Step 1 - Confirm Registration Flags Setup
1. An administrative user must go into Settings > Administrative > Reference Data Management > Event Registration Categories.
2. Select a registration category identified as Zoom or In-Person and confirm the appropriate Flag on the right.
3. Review/set flag for each of the 4 specified registration categories.
4. Click Save & Close when all Flags have been confirmed/updated if necessary.

________________________________________________________________________________________________________________
Step 2 - Create New Virtual Only Event Location
The best way to categorize Zoom-only events on the online calendar is to add a new event location called Virtual Only. See Adding a New Event Location to complete this process.
In-person and hybrid events should be set to the appropriate onsite event location.
Regardless of the event Location, if an event has Online Meeting Setup, the Zoom icon will appear on the individual calendar item online - so this applies to Zoom-only and hybrid events.
If you have added a new event location and it is not automatically displayed on your online, contact Support@Connect4.net to request that the location be added.
_______________________________________________________________________________________________________________
Step 3 - Import & Setup New Confirmation Emails
New Registration Confirmation Email Standards:
All events will end up with one of the following 3 standard confirmation emails assigned:
- Hybrid Registration Confirmation Email - for hybrid events, providing in-person and Zoom info.
- In-Person-Only Registration Confirmation Email - Assign to in-person-only events.
- Zoom-Only Registration Confirmation Email - Assign to Zoom-only events.
1. Save the attached Package A to your computer.
- This file will automatically save as a Gnosis file type; you do not need to select a file type.
- You will not open this file from the saved location; you simply need to save the file.
2. Import the saved package/file directly into your Event Registration Communications category. Find instructions on how to import this package here (go to Importing section). The attached Package A contains:
-
-
-
- Registration Confirmation Email - Hybrid Event
- Registration Confirmation Email - In-Person Event Only
- Registration Confirmation Email - Zoom-Only Event updated version
-
-
2. Carefully review and customize the email content only for all three items. The recipient group assigned to the item is already set and does not require changes.
________________________________________________________________________________________________________________
Step 4 - Import & Setup New Event Reminders (Email & Text)
Event reminders are now split into three groups:
Zoom Registrants - Zoom-only and hybrid events
In-Person Registrants - Hybrid events only
In-Person Registrants - In-Person-only events
1. Save the attached Package B to your computer.
- This file will automatically save as a Gnosis file type; you do not need to select a file type.
- You will not open this file from the saved location; you simply need to save the file.
2. Import the saved package/file directly into your Event Registration Communications category. Find instructions on how to import this package here (go to Importing section). The attached Package B contains:
- 1-Day Reminder Emails for
- Zoom
- In-person hybrid
- In-person-only
- Same Day Reminder Emails for
- Zoom
- In-person hybrid
- In-person-only
3. Carefully review and customize the email content only or all 6 items imported.
4. Optionally, if you are using Same-day Text Reminders, save and import Package C:
- Reminder Texts for
- Zoom - Same Day
- In-person hybrid - Same Day
- In-person-only - Same Day
- Zoom - 1 hour before event.
NOTE: These items must be imported to your Event Text Message category
Carefully review and update email content only for all three text items imported.
________________________________________________________________________________________________________________
Step 5 - Schedule Reminder Emails and Texts
See Email & Text Messaging Scheduler for guidance on deleting and scheduling items.
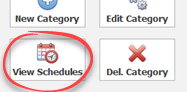
- Delete all currently scheduled reminder emails and texts. PLEASE NOTE: Be sure to cancel the schedules for those items before deleting them otherwise the communications will continue to send. You can easily delete schedules using the "View Schedules" button on the main category screen:
- Schedule newly imported reminder email/text items for recurring daily send between 6 am and 7 am.
No communications will be sent until there are appropriate registrants to receive them. We recommended scheduling your reminders now so they are not forgotten later.
For schedule Notification settings, add at least one staff person to receive Success and Failure notifications; the Empty notification can be left as unassigned.
NOTE: Each reminder for the 3 event registration types must be set to ensure that all three event/registration scenarios are covered; there are three types of reminders for each timeframe. For example, if you are using 1-day reminders, all three 1-Day Reminders must be scheduled daily to successfully reach all types of event registrants.
________________________________________________________________________________________________________________
Step - 6 CSC/Gilda's Only - Turn Off Temporary Attendance Setting
When you are officially launching your hybrid event offerings you can turn off the temporary setting allowing digital attendance to be tracked as in-person.
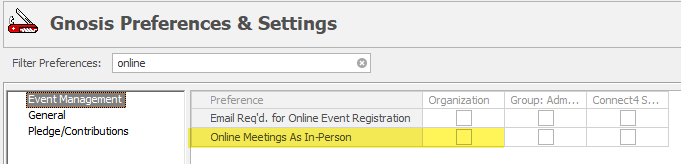
- Go to Settings > Preferences & Settings > search for "online"
- Go to Event Management > uncheck the box for Online Meetings as In-Person.
- Press Save & Close
Comments
0 comments
Please sign in to leave a comment.