Gnosis provides a button in the communications module to upload images and documents to your server to use in email messages. To otherwise manage files on your server, it is necessary to have an FTP application to change, download or delete files from your Gnosis Portal Web Site. For casual FTP access, you can actually use the file manager included in your Gnosis Hosting Portal (see below). If you plan to perform more than an occasional file change, you will probably want to install an FTP application to do this.
There are several applications which provide decent FTP access including those with FTP built directly into HTML editors such as Dreamweaver and Expressions Web. If you don’t already have an FTP application that you use, we recommend CuteFTP Lite for this purpose – priced at $25.00 CuteFTP Lite is a bargain with an easy-to-use interface and will provide you with the functionality you need.
Filezilla is another application that can be used however, the interface is more complicated and a certain amount of user experience is required for this product. Filezilla is open-source (freeware), and therefore there is no charge associated with the product. Connect4 is happy to support your use of CuteFTP for managing your Gnosis web site files.
The instructions below will support you in gaining FTP access to your website and includes the steps necessary to download, configure and use CuteFTP Lite if you choose to do so.
Your FTP Credentials
You may have up to 5 FTP accounts defined in your Gnosis Hosting Portal account. To access files on your Gnosis Portal Web Site you will need to have the login information (referred to as ‘Credentials’) to access the files.
FTP User Name and Password
FTP user name and password can be obtained from the Gnosis Hosting Portal:
- Access the Gnosis Portal at https://portal.gnosishosting.net
- To login, use your username and password for the Gnosis hosting portal – you received these when you first set up your Gnosis Account. If not, contact Gnosis Support to have the information re-sent.
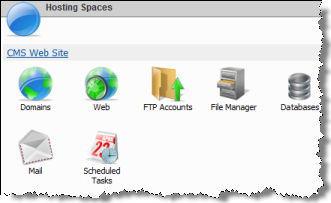
- Click on FTP Accounts
- Create new Account or change password on existing account
- If you need to CREATE an FTP account:
- Click on Create FTP Account
- Choose a User name and Password.
- Home Folder – the home folder should generally be set to the wwwroot folder as this is the base of all files on your website. To navigate to the wwwroot folder:
- Click in home folder box then click on the triangles to the left of the folders until the www root folder is displayed.
- Click on the wwwroot folder to fill in the home folder box with the correct Home folder information
- Access Rights – both of these boxes should be checked to provide read/write access
- Press Save to save your changes
- If you need to CREATE an FTP account:
- To use an existing FTP account already listed, you will need to change the account’s password if you do not know it already.
- Click on Edit FTP Account.
- Change the password to one you desire.
- Press Save to save your changes.
FTP Server / Hostname
You will also need the name of the server for your Gnosis Portal website. This may be the name of your organization’s main web site if Gnosis portal functions are installed there, or a separate Gnosis portal website, depending upon how your organization has decided to configure its web sites. If you are unsure, check with your site administrator.
This server name will be in the format www.YourOrganization.org if it shares your main website, it may be www2.YourOrganization.org if it is on a separate website but you have added it in your organization’s domain or finally, it may be YourOrganization.GnosisHosting.net if neither of the above have been used. This last format will generally work for all sites.
Note: The Gnosis Portal Server requires “Passive Mode” to be set Off, or, Active (Port) Mode set On. If you are using CuteFTP to access your site, this is covered in the instructions below.
Installing CuteFTP Lite
Navigate to the CuteFTP site using the following url: http://www.globalscape.com/cuteftplite/
Download & Install Cute FTP
- Click the DOWNLOAD button
- You will be given the opportunity to either download a trial copy or purchase the software immediately. Choose the option you prefer and click Download.
- Save the File. You should save it in a location that you can find using whatever prompt is provided by your web browser.
- Find the downloaded file “cuteftp.exe” and double-click on it to begin the installation. A window will appear which says “Welcome to the Installer for CuteFTP Lite. Click Next
- Click Yes on the next window to accept the license agreement
- The next window provides the destination folder in which to install the product. We recommend that you simply use the destination folder provided. Therefore click Next to proceed to the next window.
- This step may take a few minutes to extract and configure CuteFTP Lite for use.
- Once the install process has been completed, a new window will appear, asking if you would like to install a shortcut on your desktop. Connect4 recommends that you click the box next to the command “Install a shortcut to CuteFTP Lite on my desktop
- Click Finish
- Password protection – CuteFTP has a Site Manager function that will contain your username and password. If you want to protect your Site Manager from prying eyes, enable this feature by clicking on “Password protect My Site Manager Now”, you will be instructed to enter a password. If you do not have a shared computer, this may not be necessary, click Next.
- Host Address – type in the Server Name (information you collected in the FTP Server / Hostname step above).
- Site Name – type in a site name that will be easy for you to identify, click Next
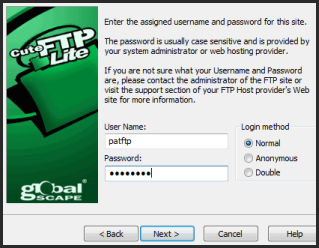
- Enter the User Name and Password that you set up for your FTP access, click Next
- Type in a path for default local and remote folders if desired, click Next
CuteFTP will attempt and fail to connect to your website as there is still one setting to be changed before your Gnosis Portal site can be accessed.
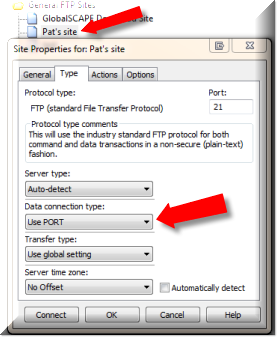
Configuring Active (Port) Mode
- On the CuteFTP Lite Task bar, click the site properties icon (circled in red here)
- In the right-hand half of the screen, right-click the item you just created designating your site name and choose “Properties” from the menu.
- Click the drop down box under Data Connection Type. Select Use PORT and click OK.
Uploading, Downloading & Modifying Images & Files
Double-Click on your site name to open a connection to the server to access your website’s files.
You are now ready to drag one or more files from your local computer to the web site and vice-a-versa. To modify a web site file, you may drag it into your local directory, modify it and then drag it back to the web site server.
NOTE: After modifying a file name, ensure you change the hyperlink that is connected to using that file in any email, on the web, or in any distributed document to match the new filename and location of the file that has been modified. See below for information on how to determine the URL of a file.
Determining File URL’s
All files to be accessed from web pages or HTML emails are referenced by “URL’s”. A url is simply a fancy name for a file location and it is made up of the following parts:
| http:// | This is called a ‘protocol’ All full URL’s start with this. |
| www.MyOrganization.Org or MyOrganization.GnosisHosting.net |
These are ‘server names’ |
| /site/images/ | Each name between a ‘/’ is the name of a folder on the server |
| MyPhoto.jpg | The file name of the file to be accessed |
When stringing all these together, the URL will look like this:
http://MyOrganization.GnosisHosting.net/site/images/MyPhoto.jpg
When you place a file in a folder on the server, you should note the folder path (ie: /site/images/). This will be needed for you to construct the URL to access the file.
See also:
Knowledge Base Article: Communicating Via Email
Comments
0 comments
Please sign in to leave a comment.